API Response
Overview
This documentation outlines the options available for the Response for BitForm. It covers all the required parameters, their default behaviour, optional configurations, and how they can be used together to customize the response.
Form Submission
A return URL is submitted with the web-hook response, which also includes the session_id and the form_id you will need all three of these plus your message to return a working message
Required Parameters
These parameters must be included in the POST request for the webhook to work.
| Parameter | Description | Required |
|---|---|---|
session_id |
A unique identifier for the session. | Yes |
form_id |
The unique identifier for the form. | Yes |
body |
The body needs to be set but can be turned off with body display | Yes |
| body_display | Determines whether the body content is shown. "yes" will show it, "no" hides the body and shows a default message |
Yes |
Example minimum response to be sent by your Automator
{
  "session_id": "example_session_id",
  "form_id": "7",
  "body_display": "yes",
  "body": "Your Body Text Here",
}
Optional Parameters
The following parameters are optional but can be used to customize the response:
| Parameter | Default Value | Description |
|---|---|---|
link_url |
N/A | A clickable link passed as an anchor tag (<a>). |
custom_link_text |
N/A | Custom text for the link. If provided, replaces the default “Visit Link” text with the custom version |
copy_button |
"no" |
If "yes", a copy button will be displayed allowing users to copy the body content of body to the clipboard. |
image_url |
N/A | HTML code for an image to be displayed. Passed as an object with the html property. (This should be the url) |
pdf_url |
N/A | Should contain the URL of the PDF document to be displayed |
has_link |
"no" |
If "yes", a link will be displayed. Default is "no", meaning no link will be shown unless specified. |
has_image |
"no" |
If "yes", an image will be displayed. Default is "no", meaning no image will be shown unless specified. |
has_pdf |
"no" |
If "yes", a PDF link or embedded PDF will be displayed. Default is "no". |
Example 2: Display PDF
Example 3: Display link with Custom Link Text
Your Automator
There are many different types of automator but the below image is from Flowmattic, layout will be different but the data sent will need to be the same.
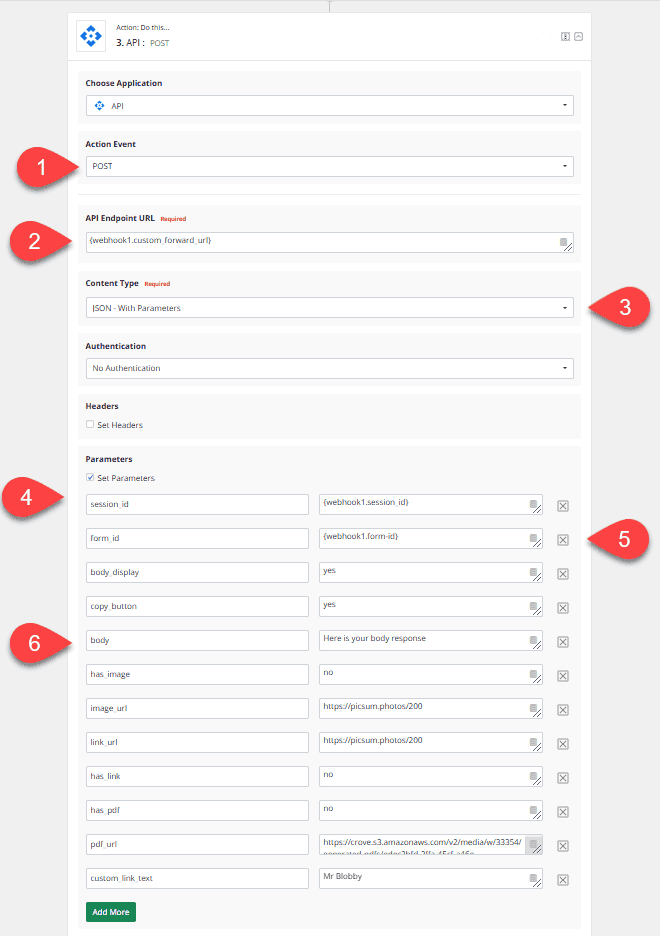
All automation plugins/services are laid out differently, but the information needed from each is exactly the same
- We need a API Post Event (we are sending data)
- The endpoint is given to you in your sent data, and this needs to be mapped to the endpoint URL and example endpoint URL would be https://domain.com/wp-json/responsefsf/v1/receive-response
- We need to make sure we are sending in the standard JSON with the parameters
- session_id is also given to you within your initial web form response. An example is responsefsf_67559df047c388.08927290
- The form_id is also given to you within your webform submission, telling you which form the data came from the format and type of these depend on the form plugin
- your body message is a requirement you can disable the body message (But it should still be sent) using the body_display parameter set to no